Putting clickable links directly into your videos is a game-changer. It turns someone just watching into someone actively shopping. This is how you directly connect the moment of discovery with the point of purchase, letting a customer click on an item they love and buy it right then and there, without ever leaving the video. For any Shopify store, this strategy is the ultimate way to close the gap between inspiration and a sale.
The Power of Interactive Video for E-commerce
It wasn't that long ago that online video was a one-way street. A viewer could watch, but that was it. If they saw a product they wanted, they’d have to leave the video, open a new browser tab, and start searching, hoping they could even find the exact item. Talk about friction. Every extra step was another chance to lose a customer.
The ability to embed links right inside a video didn't just appear out of thin air. It started with clunky early web tech. The first real glimpse of this was with Adobe Flash back in the late 1990s, which allowed for clickable spots inside a video player. But the big leap forward was the move to HTML5 video between 2011 and 2016. Suddenly, interactive video worked on any modern browser, no plugins needed.
From Passive Views to Active Purchases
This shift in technology is exactly why adding links to your videos is so powerful for e-commerce brands today. It changes the entire dynamic. Your customer goes from being a passive observer to an active participant in the experience. They aren't just watching a product demo; they're engaging directly with the items you're showing them.
When you make your videos interactive, a few incredible things happen:
- You slash the friction. It creates the absolute shortest path from a customer thinking, "I want that," to "I just bought that."
- Engagement skyrockets. Clickable elements naturally make people pay closer attention and spend more time with your brand's content.
- Conversion rates climb. By making it ridiculously easy to buy, you capture those impulse shoppers and motivated buyers the second they feel inspired.
By turning your video content into a virtual storefront, you’re not just showing products; you’re selling them in the most intuitive way possible. It’s about meeting customers where their inspiration strikes.
To get a sense of the bigger picture, it's worth looking at how this trend is playing out across the web. Checking out guides on setting up a shoppable video presence on platforms like TikTok Shop can give you a feel for how crucial this is becoming.
Of course, before you can add links, you need a great video. The goal is to make your content work harder for your business, and that starts with solid visual storytelling. For a deep dive on that, take a look at our guide on how to create product videos that actually grab attention and get results.
Why Shoppable Videos Are a Game-Changer for Shopify Sales
When you embed clickable links into your videos, you're doing something far more powerful than just adding a neat feature. You're fundamentally redesigning the customer experience. You close the gap between that first spark of "I want that" and the final click to buy. This is precisely why shoppable videos work so incredibly well for Shopify merchants—they turn a passive viewer into an active, engaged shopper.
Think about a home decor store. You might have a gorgeous video showcasing a perfectly arranged living room. With a standard video, a customer sees a lamp and thinks, "Wow, I love that lamp," and then maybe—just maybe—they'll go hunting for it on your site later. With a shoppable video, they click on that lamp the second they feel that impulse, see the price, and can add it straight to their cart. All that friction? Gone.
Closing the Gap Between Discovery and Checkout
The real magic here is how drastically you shorten the path to purchase. Every extra click, every new browser tab, every search on your store is another chance for a potential customer to get distracted and leave. By keeping the entire discovery-to-cart journey inside the video player itself, you capture their attention when their desire to buy is at its absolute highest.
This approach is a natural fit for products where seeing is believing:
- Fashion Boutiques: Imagine a model showing off a complete outfit. A shopper can click on the jacket, the pants, and even the shoes, all individually, to learn more and buy what they love.
- Beauty Influencers: As a makeup artist applies a stunning shade of lipstick in a tutorial, a hotspot can pop up, letting viewers buy that exact product on the spot.
- Artisanal Food Brands: A video might walk through a unique cocktail recipe. Viewers can instantly click to buy the small-batch gin or the special bitters being used.
The point isn't just to show off your products; it's to make them instantly shoppable. You’re turning your video content from a simple marketing piece into a high-powered, direct sales channel.
The Numbers Don't Lie: A Look at Engagement
Before we dive into a comparison, let's be clear: interactive content consistently blows static content out of the water. When you give your audience something to interact with, they lean in, pay more attention, and stick around longer. In fact, research shows these features can lift viewer engagement time by as much as 35%—a massive win for any online store.
Some studies have even found that videos with clickable CTAs can boost conversion rates by up to 80%. Why? Because you’re not just hoping for a sale; you’re guiding the user directly to it.
Here’s a simple breakdown of how this plays out in the real world:
Impact of Interactive vs. Standard Video on Shopify
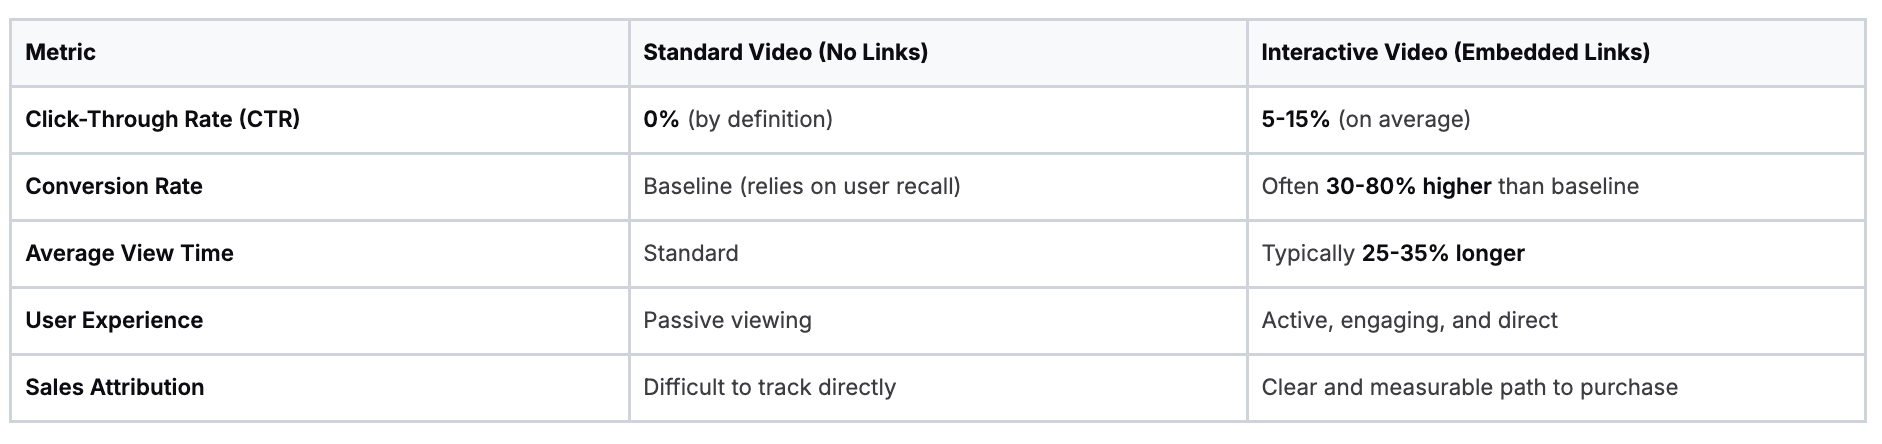
The table above really says it all. You move from a passive, hard-to-measure asset to an active sales tool with clear ROI.
This heightened engagement leads directly to better business results. You can see this in action by checking out these real-world examples of 5 Shopify stores boosting sales with shoppable video.
Ultimately, embedding links in your videos isn't just a trend. It's a proven strategy for getting customers more involved, helping them understand your products, and making a real impact on your bottom line.
Getting Moast Hooked Up to Your Shopify Store
Jumping into a new tool can sometimes feel like a chore, but I've found that getting Moast connected to a Shopify store is refreshingly simple. The whole point is to get you from installation to a live, shoppable video in just a few minutes. This isn't about wrestling with complicated settings; it's about getting straight to the good stuff.
First things first, you'll want to pop over to the Shopify App Store and grab the Moast app. The installation is as standard as it gets—you click to approve the permissions, and it slots right into your Shopify admin. That tight integration is the key, as it lets Moast sync with your product catalog automatically.
Because of that direct link, you can say goodbye to manually typing out product names, prices, or hunting down images. When you’re ready to embed links in your video, your entire product collection is already there, waiting for you inside the Moast editor.
A Quick Tour of the Moast Dashboard
Once the app is installed, opening it up drops you into your new command center. The dashboard is clean and really easy to navigate, designed to push you right into creating. You won’t get bogged down in a mess of menus. Instead, the layout points you straight toward the most important task: adding your first video.
It’s worth taking a quick second to get your bearings. You’ll notice a few main areas:
- Video Library: This is home base for all your uploaded videos. As you create more shoppable content, you'll be coming here to manage everything.
- Analytics: It'll be empty at first, but this is where you’ll eventually see all the juicy data—views, clicks, and most importantly, sales driven by your videos.
- Account Settings: This is where you can handle your subscription and other general store settings.
A great dashboard shouldn't overwhelm you with options. It should clear the path so you can focus on being creative. Moast's interface is built to be simple and action-focused, helping you get from upload to published video without any friction.
Uploading Your First Video
Ready to make some magic? The first real step is to get your video into the system. Just find and click the prominent "Add Video" button and choose a file from your computer. Moast handles the usual video formats like MP4 and MOV, which are what most cameras and editing programs spit out anyway.
For the best results, here are a few pro tips I always follow for video files:
- Resolution: I always aim for 1080p (1920x1080 pixels). It gives you that sharp, professional look without making the file so massive that it takes forever to upload.
- File Size: Moast is pretty robust, but keeping your files under 500MB is a smart move for speedy processing.
- Format: Stick with MP4 if you can. It’s the gold standard for a reason, offering the best mix of quality and compression for web video.
After you upload it, your video will process for a moment and then appear in your library. You’re now on the verge of the fun part—making it shoppable. Getting this initial setup done is the crucial first step. If you want a more in-depth look, our guide on how to add shoppable videos to your Shopify store in 3 easy steps breaks it down even further. With your first video locked and loaded, you're perfectly set up to start adding those all-important interactive links.
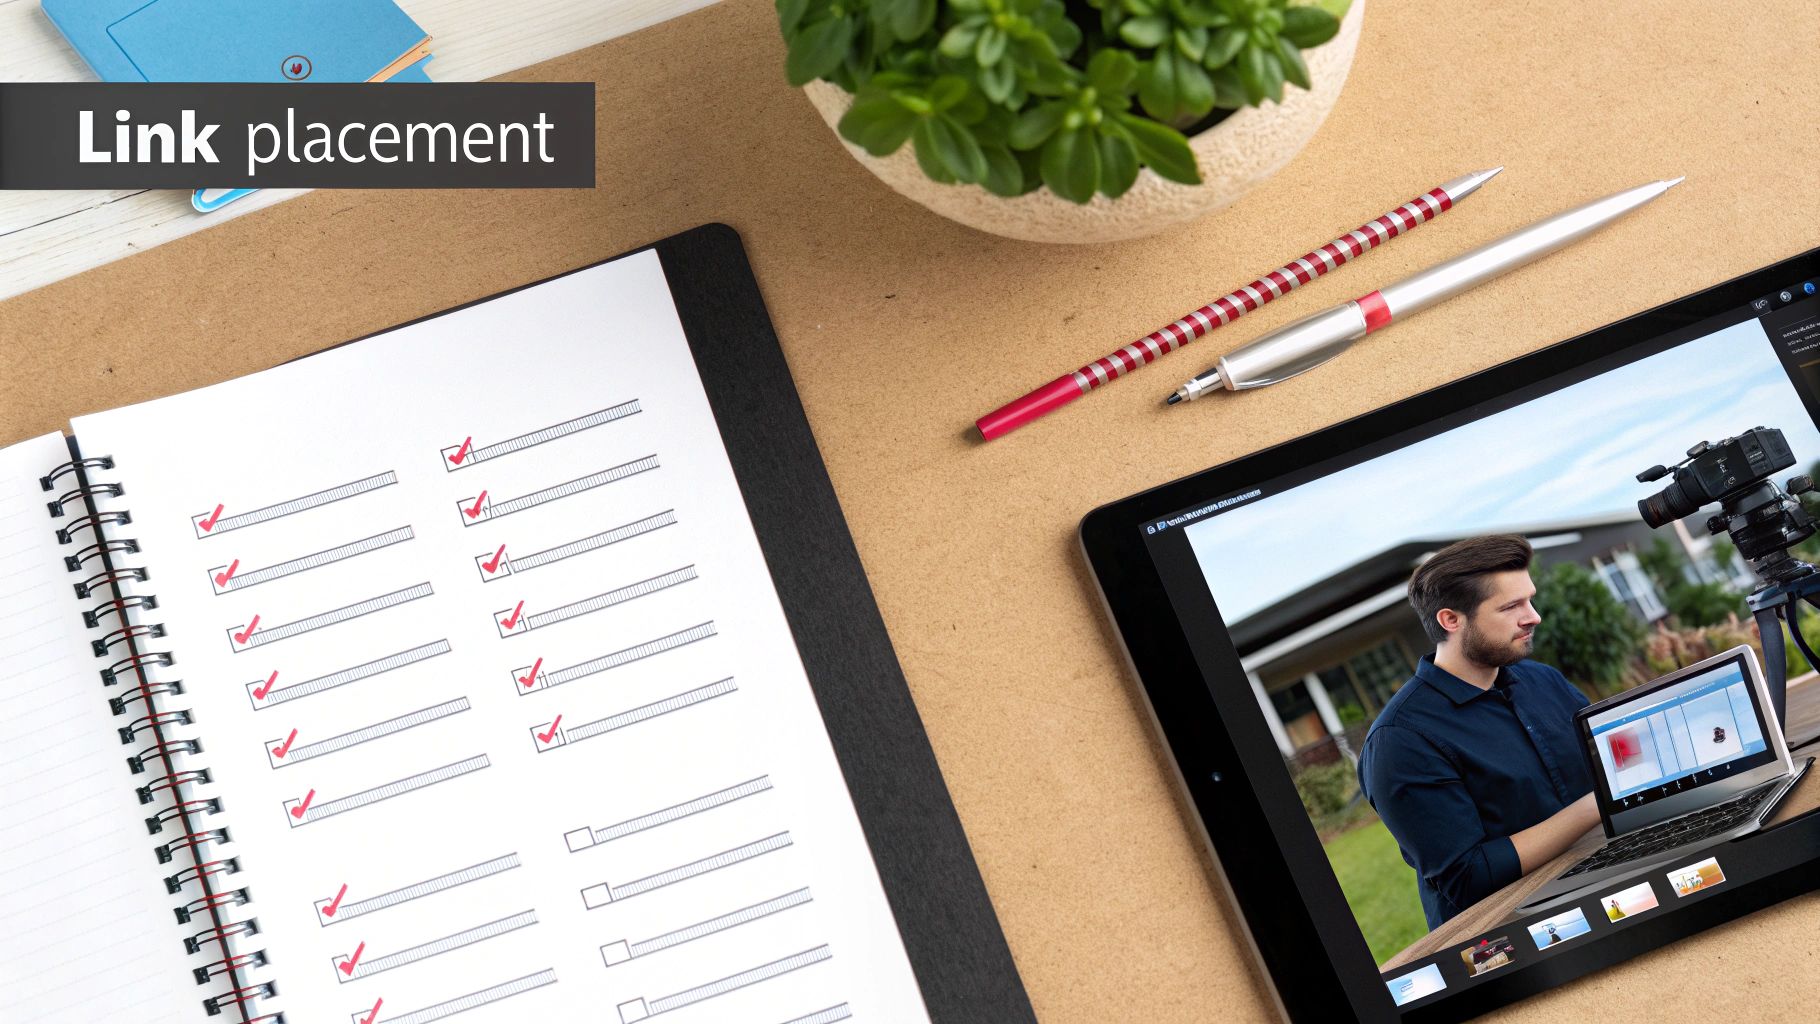
How to Add Clickable Product Hotspots
Alright, you've got your video uploaded and Moast is talking to your Shopify store. Now for the fun part. This is where you get to turn a regular video into an interactive shopping experience by placing clickable links right on top of your products. It's surprisingly intuitive, and you have total creative freedom to make it look just right.
Inside the Moast editor, your video is ready and waiting. Your first move is to play the video and pinpoint the exact moment you want to tag an item. Let's say you're showing off a new ceramic mug. You'll want to pause the video when the mug is perfectly in focus and looks its best. Getting the timing right is key—you want that hotspot to pop up the instant a viewer is thinking, "Ooh, I like that."
Once you've paused it, just click to add a new hotspot. Since Moast is already synced with your Shopify inventory, a search bar will pop up. Just start typing the name of your mug, and Moast will fetch it directly from your store, pulling in the name, price, and even the product image. One click, and the product is officially linked.
Customizing Your Hotspots for Brand Consistency
A generic button just isn't going to cut it. For your video to feel like a seamless part of your brand, every little detail counts. That's why tweaking the look of your hotspots is so important. After you link a product, Moast gives you a straightforward set of tools to make it your own.
You can easily change things like:
- The Icon: Swap out the default icon for something that matches your brand's vibe. Maybe you prefer a simple plus sign, a little shopping cart, or a subtle dot.
- The Color: Adjust the hotspot's color to perfectly match your store's branding. If your brand uses a specific shade of green, you can plug in the exact hex code for perfect consistency.
- The Size: Make the hotspot bigger for hero products or shrink it down for a more minimalist, clean aesthetic.
The real goal here is to make the clickable elements feel like they truly belong in the video, not like they were slapped on as an afterthought. This kind of attention to detail is what builds trust and gives your video a polished, professional feel.
This simple diagram shows the basic idea: take your video, add that interactive layer, and then publish it for your customers to see.
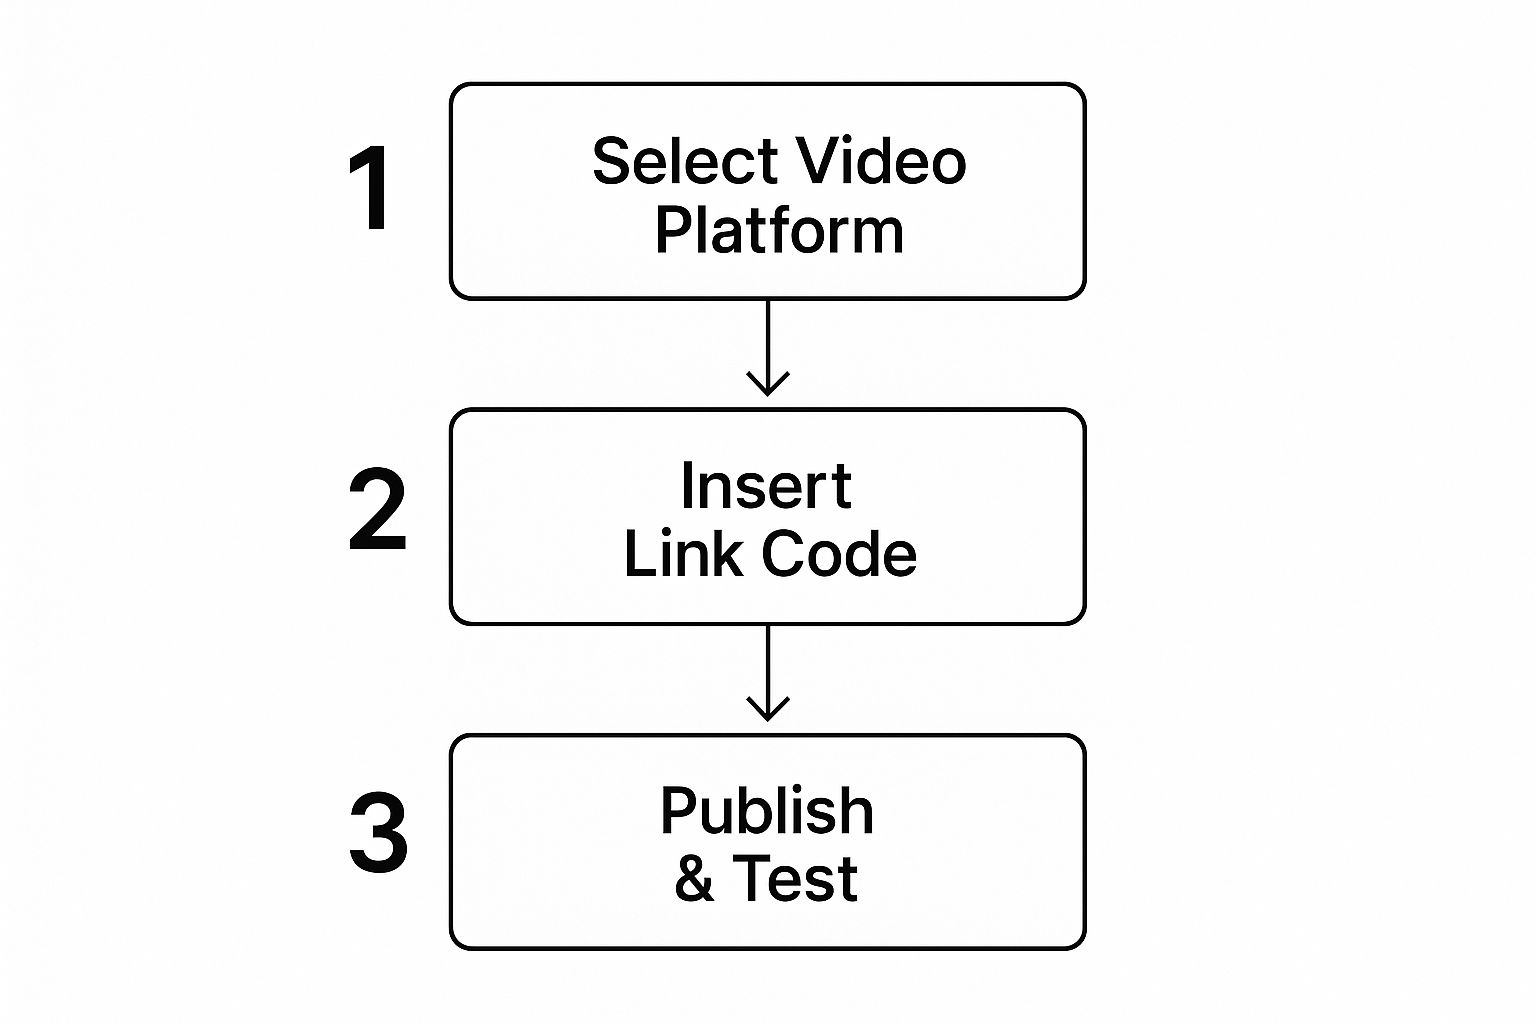
The graphic really just breaks it down to its core: select your video, add the interactive elements, and then push it live.
Best Practices for Hotspot Placement and Timing
Adding hotspots is the easy part. Placing them thoughtfully is what separates a truly effective shoppable video from a cluttered, confusing one. Remember, you're not just embedding links in video; you're guiding your customer's attention and making it incredibly easy for them to shop without feeling overwhelmed.
Here are a few practical tips I’ve picked up over the years:
- Don't Overcrowd the Frame: If you're showing a full outfit with multiple products, stagger the timing of the hotspots. Let the one for the shirt appear first, then have it fade out as the hotspot for the jeans fades in a few seconds later. This keeps the screen clean and the focus clear.
- Place Hotspots Directly on the Product: This sounds obvious, but you'd be surprised. Precision is everything. Put the clickable icon right on top of—or directly next to—the item it represents. This leaves zero room for confusion.
- Think "Mobile-First": Most of your customers are probably watching on their phones. Make sure your hotspots are big enough to be tapped easily with a thumb and aren't tucked away in a corner of the screen where they're hard to reach.
A perfect real-world example is a "get ready with me" video for a skincare brand. As the influencer applies a serum, its hotspot appears for a few seconds. Then, as they move on to a moisturizer, that first hotspot fades away and the new one fades in. This sequential flow feels natural and helpful, not like a pushy sales pitch. It's that kind of careful choreography that makes interactive video work so well.
Getting Your Shoppable Video Live on Shopify
You’ve done the creative work—your video is polished and the interactive hotspots are perfectly placed. Now it’s time for the final, crucial step: getting this new sales tool in front of your customers on your Shopify store.
Thankfully, Moast makes this part incredibly straightforward. Instead of wrestling with complex code, you get a clean, simple embed code that you can copy and paste just about anywhere.
Inside the Moast editor, just look for the "Get Embed Code" button. A single click copies a small HTML snippet to your clipboard. That's it. This little piece of code is the key to bringing your interactive video to life.
Where Should You Place Your Video?
The beauty of this is its flexibility. You can place your shoppable video on almost any page, but for the biggest impact, you need to be strategic. Think about where your customers are most engaged or where a video could answer key questions.
From my experience, these are the top-performing spots:
- Product Pages: This is a no-brainer. Add a shoppable "how-to" or a lifestyle video right alongside your product photos. It gives customers a much richer, real-world feel for what you’re selling.
- Dedicated Landing Pages: Launching a new collection? Create a dedicated page for it and make a stunning shoppable video the main event. It’s a powerful way to build hype and drive focused sales.
- The Homepage: Want to grab attention the second someone lands on your site? Feature your latest shoppable video front and center. It’s an instant engagement booster.
Dropping the Code into Shopify
Once you've picked the perfect spot, head over to your Shopify admin and navigate to the page, product, or blog post you want to edit.
You'll need to switch from the standard visual editor to the HTML view. Look for a small icon that looks like two opposing brackets: <>. Clicking this will show you the underlying code of the page. Don't be intimidated!
Find the exact spot where you want the video to appear, click, and paste the Moast embed code you copied earlier. Save your changes, and you're done. Your interactive, shoppable video is now live, ready to engage customers and drive sales.
If you want to dive deeper into the strategy behind it all, we've put together a guide on https://moast.io/blog/ecommerce-video-marketing that’s packed with ideas.
The ability to embed content like this so easily is something we often take for granted. It was the introduction of HTML5 that truly changed the game, allowing for interactive overlays and clickable elements without clunky, outdated plugins. This shift happened right as streaming video was taking off, creating a perfect storm for interactive content.
One last thing to keep in mind after you publish: you want search engines to find your new content. If you're not familiar with how search engine indexing works, it's worth learning the basics. Ensuring your page gets indexed properly means more potential customers can discover your amazing new shoppable video, maximizing its reach and return.
A Few Common Questions About Shoppable Video
Getting ready to jump into shoppable videos is exciting, but it's totally normal for a few questions to pop up. I hear them all the time from Shopify merchants. Let's walk through some of the most common ones so you can get started with confidence.
"Will This Slow Down My Website?"
This is probably the #1 question I get, and for good reason. We all know that a slow site kills conversions.
The good news is that modern tools are built for this. A platform like Moast doesn't actually host the video file on your Shopify site, which would definitely be a drag on performance. Instead, it uses a Content Delivery Network (CDN). Think of a CDN as a worldwide network of super-fast servers. When a customer watches your video, it loads from the server closest to them, not from your store's server.
This setup means your site speed stays snappy. The clickable links you add are just a lightweight bit of code that loads on top of the video, so the impact on your page load time is minimal.
"Can I Actually Track Clicks and Sales From the Video?"
Yes, absolutely! Honestly, this is what makes shoppable video a genuine sales tool instead of just a cool gimmick. If you can't track it, you can't improve it.
A good shoppable video platform gives you all the data you need right at your fingertips. You should be able to see key performance metrics like:
- How many video views you're getting.
- Which product hotspots are getting the most clicks.
- Your overall click-through rate (CTR).
- Most importantly, how many add-to-carts came directly from the video.
This kind of data is gold. It shows you precisely which videos and products are resonating with your audience, letting you double down on what works and prove the ROI of your efforts.
"Can I Post These Interactive Videos on Instagram or TikTok?"
This one causes a bit of confusion, so let's clear it up. The short answer is no, you can't embed the fully interactive video directly into your Instagram feed or a TikTok post. Social media platforms have their own closed ecosystems and native shopping tools.
But that's okay, because social media is the perfect place to promote your shoppable video. The strategy looks like this:
- Create a short, exciting teaser clip from your main video.
- Post it to your social channels (Reels, TikTok, Stories, etc.).
- Use a strong call-to-action that drives people to a link—either in your bio or a direct swipe-up link in a Story.
That link sends them to a landing page on your Shopify store where the full, interactive shoppable video lives. You use social media to create the hook, and your website provides the complete, seamless shopping experience.
Ready to turn your video content into a real revenue driver? With Moast, you can add free, shoppable videos to your Shopify store in just a few minutes, with no limits on views. Get started today at https://www.moast.io.
Related content


Turn your social content into a revenue channel
Turn your TikToks and Reels into shoppable videos and boost conversions by 3.5x.